Re-ment Elementary-School Stationery

Compared to the previous Re-ment stationery set that I've introduced in one previous post, this one, directly translated as "Elementary-School Stationery", contains more Japanese cultural elements. Although it's amazingly detailed, you can see the previous set is generally about all kinds of student stationery which you may see in both Asia and Western countries. Both of the two sets have high quality. But I definitely need to introduce the background about this set more because of the cultural element. I don't know Japanese, but a few Japanese words are identical as Chinese characters. And I can relate to most of the things in the set because they were my childhood and my elementary school life as well.

1. Schoolbag
You can see two exercise books and a clarinet. And there are some small pieces of paper (I don't know what those are).


The blue book with the print of dog is used for teacher-parent contacts. It was like we record a list of homework in it when our teachers assigned daily and add a checkmark once we finish a line on the list. Each night parents took a look at the list and made sure we finished all the tasks and signed their name and left comment for the class teacher. The next day teacher will go through all the parents'signatures of the whole class and leave feedback if needed. Next to it is an exercise book for Japanese. Yes, just like American students have English class, we all have a class named our mother language. And I don't know if it's still like that, but when I was little, we were asked by school to learn a small music instrument. We could select between clarinet and harmonica. :)

2. "Four Treasures of the Study"
It generally means the writing brush, ink stick, ink stone and paper. In ancient east countries including China and Japan, calligraphy was a necessary capability for people who were considered as "educated" or "scholar". Of course our generation is not required to learn it but see it as a hobby, art and skill too.

This kit for calligraphy includes writing brush*2, inkstone, inkstick, ink bottle, water bottle, paperweight and a writing book which is more than 4 treasures and basically all you need to do calligraphy. Although calligraphy was not any more a necessary skill when we were little, we were regularly assigned writing-practice homework so we still had a similar kit at home like this mini one. We were not expected to reach an expert level or any good performance. It's really difficult to do it right without tons of practice. Teachers and parents asked us to do it so that we would learn to be patient, calm and persistence. It's a lesson more about character building than writing skill. Today some Chinese seniors are still very good at it. Like the current Chinese president, his calligraphy skill is very good.


3. Chemistry Lab
I have no idea what's this experiment about. Actually I didn't start to learn chemistry until junior school. But in high school we could choose either chemistry or physics as our main major. And I chose physics. After that I gave all my chemistry sense back to teacher and remembered nothing about it...

The round thing looks like a potato to me...And the purple thing in the test tube reminds me of iodine.


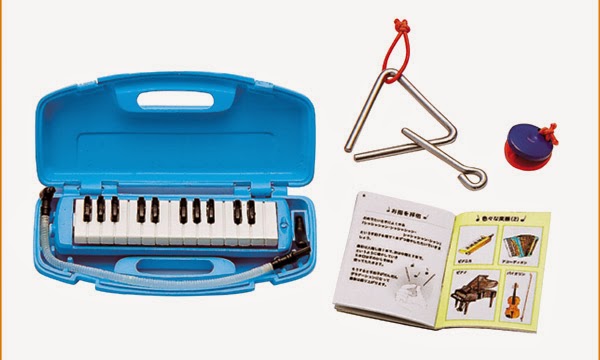
4. Music
I think it's like a toy instrument set that kids always have and play the little band with the playmates.


The little instruction book introduces different small instruments. Each page is different.


5. Kids' Meal
I heard in Japan kids are provided with milk at lunch. When I was in elementary school milk was given after two morning classes. And after another two morning classes we would have lunch. A snack would be provided in the afternoon.


I wonder what's in the small pink bag.

6. Picnic
Awww I love the pink rabbit lunchbox set. I will definitely buy one for my kid in the future since I am too old for that. :P


Pocky pocky pocky! Very popular snack in Japan and China.
 

Did I show you this photo? We have far more flavors in China than those in the Asian market here.

7. Abacus
It seems like another Asian thing in this box --abacus. But I don't have experience with it. Guess I was born too late when advanced technology appeared. But I know in some school abacus class is provided as a hobby. It's an old thing just like calligraphy. I like the cute pencil boxes and other small things in this set. I forgot including the snack when taking the photos.


8. After School
Skipping-rope, puzzle, snack, little cups, sketch book and color pens and a toy called "Tomy Wonderful Ring".


Tomy Wonderful Ring Google Picture:

9. My Treasures
A yellow panda cup, clock, electrical pencil sharpener, comic book and bookend, piggy bank and wishing bottles.


10. Sewing Kit
Unfortunately, unless you learned it by purpose, my generation in China didn't have any school class teaching sewing. My mom doesn't know it either so no one ever taught me how. But in Japan sewing class is very basic starting at a young age. What an important skill and I regret never to learn it. I could save so much on dolls' outfit if I knew how to sew.

I think this box is a great addition to the sewing machine in Re-ment French Sundries Set.


I hope you enjoy this set and the photos! :) 

I have many fond memories of elementary school life. I was always a good student, had lots of friends. My friends and I lived in the same neighborhood and went to school together. My favorite class was English and the teacher who taught it was my favorite at the time too. I was on TV once attending a contest. And swimming with friends in the summer break was the best time. But sadly all things were shadowed by an abusive female class teacher. I don't want to talk about her here to ruin my post though. But my elementary experience was so much painful because of her that even today I forgave her but never forgot...

Well, I think I may start another post to talk about it in the future...

Re-ment Desk

I planned to take photos for the “elementary school stationery” set. Then I thought since I would set up the desk; why not take a Blythe photo first? After doing it I was already tired and had no energy for taking more photos so I would leave the task till next time I pick up the camera.
So there are only two photos this week. But I hope you enjoy it.
 
  EmmaGrace: Pokey, I need do homework, can you play alone?
                                Pokey thinking: But it is Friday! :(
 
Oh there's one more photo that I took weeks ago. Cute dresses for girls. Made by a Japanese crafter.
 
Have a good weekend!

Wainscoting Tutorial

I believe you’ve seen the wainscoting that I made in this diorama project. Today I am going to introduce that how I made a simple background with wainscoting. I’ve been asked by couple friends who are also interested in making one. I was a little bit afraid that I couldn’t describe it clearly in words. But I really want to give it a try and do my best. Hope it will be helpful and inspiring.

Use the diorama project as an example, first I prepared those materials and tools:

Big wood pieces*3: but if you want a diorama with 3-side walls you need 4 big wood pieces. The one used for the floor base should be bigger and firmer. If it’s for a 1/6 doll, the size I recommend is (the thickness of my wood piece is 0.4 inch):

A handy craft saw (or any other kind): in case you need to cut the thick wood pieces into the size you want.

Thin, easy-to-cut wood pieces: used to make wainscoting, buy enough to cover all the walls. I recommend a 6-inch-tall wainscoting. The size in the photo is too short. I just use it as an example to make a smaller one. And the material of this piece is Balsa which is really easy to cut.


Scissors: good enough to cut the thin wood piece into small pieces. I got my scissors on Amazon (link).

Glue: I used the craft glue found in dollar store. But you may use anything that you are confident to glue the wainscoting to a thick paper.


Miniature baseboard: I directly bought them from store. You can find them on eBay too. Here is one link.


Thick craft paper *1: Any thick flat paper. I took one that I don’t like very much from the craft paper lot. Because you only need it as a base. I glue wainscoting to the thick paper first, then glue a whole piece to the diorama wall.

Pigment and brush: Any kind that you think is easy to use. The pigment should be attached to the wood.

I will show an example in this post. Notice it’s not a complete size for a diorama to use. I just make it as an example.

First, use hammer to nail the 3 big wood pieces together. This part is easy so I don’t really make it this time. It will look like a diorama base just like this:

Next, mark the strip that you will cut from the thin Balsa wood. The interval of my real wainscoting project is 1.5cm.

And you cut it. I use the same scissors shown above. You may have a better way.

Glue it to a thick craft paper. At this point you need to make sure the total length of the wainscoting is what you need for the wall that you will later glue to.

Notice it’s not very flat because the glue is not dry yet. Wipe away extra glue and place any heavy object on it for a night (at least couple hours) to make it dry and flat. If you don’t want glue attach to the object you use you can put a napkin in between. I use a stack of printing paper.

Now it’s flat so you can paint the color you want.While wait the paint to dry you can cut 2 strips of miniature baseboards (the same length as the wainscoting) and paint it the same color.

Cut off the extra paper.

Glue the miniature baseboards to the wainscoting and make so it looks like margin. Fix any painting defects.

Now you finish one piece of wainscoting. Keep working until you have the entire wall covered. I recommend that you spread the wallpaper on the wall first before glue the wainscoting to the wall so you can hide any unsmooth part existing on the wall paper.

Basically it’s not hard to make. It needs patience and takes time. I hope the instruction is clear and it will be helpful.

Good luck with your project friends!